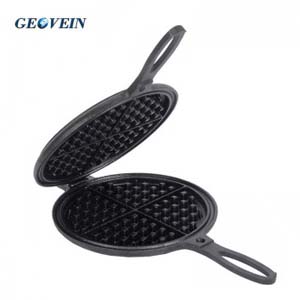
Dreaming of delicious waffle breakfasts, but don’t have the counter space for yet another appliance? The best stovetop waffle irons are made from cast iron and are compatible with multiple cooktops.
As the name implies, these waffle makers are designed to be put directly on your stovetop, and they usually work on gas and electric cooktops, as well as camping stoves or open fires.
Benefits of Cast Iron Waffle Maker
Simple handling and cleaning: People are often curious about how to clean waffle makers. Are they prone to leaving a stubborn stain? No. The waffle maker, also known as a waffle iron, is one of the easiest appliances you can clean. Spray oil on the plates to ensure that your waffles come out clean.
Heating quickly: Waffle makers take less time to heat than an oven or stove. A quick heating feature in the thermostat system makes it possible to make waffles quickly.
Make multiple dishes: This miracle appliance will make your breakfast table look amazing every day. A cast iron waffle maker can make waffles, cookies, and pizzas.
It’s not messy or greasy: Waffle makers are easy to use and clean up after they have been turned on. After waffles have been made, there is no residue of grease or untidiness.
It’s not expensive: Waffle makers don’t have to break the bank. This electric counter appliance is ideal for those who want to make healthy desserts every day.
Simple Cast Iron Waffle Recipe
Waffles made in a cast iron pan are decidedly different from those made in a conventional or Belgian waffle maker. The former are thinner and crisper than those made by an electric maker.
Ingredients
Yield: 4 servings
2 large room-temperature eggs, separated
1 3/4 cups all-purpose flour or 2 cups cake flour
3 teaspoons baking powder
1/4 teaspoon salt
1 1/4 cups milk
2 tablespoons sugar
1 teaspoon vanilla
6 tablespoons melted, cooled butter
Directions
In a medium bowl or stand mixer, beat egg whites until stiff. Set aside.
In a separate small bowl, whisk together flour, baking powder and salt. Set aside.
In a separate medium bowl, beat together egg yolks, milk, sugar, vanilla, and butter until well incorporated.
Gradually add reserved flour mixture, beating only until just combined. Do not overmix.
Stir in 1/4 of the beaten egg whites to lighten the batter. Then, gently fold in the remaining egg whites trying not to deflate the volume.
Portion into a hot waffle iron until batter is within 3/4 inch of the edge to allow for expansion (see the note, below). Start with 1/4 cup batter, but this will take a little experimentation with your particular waffle iron. Close the lid. Cook for 1 minute. Flip the waffle iron and cook for 2 minutes. Remove cooked waffle with a fork.
Let the waffle iron reheat and repeat with the remaining batter. Adjust the cooking time based on the results of your first waffle. Serve warm with butter and syrup or fresh fruit and whipped cream.
Note: The iron should not be dragged across a glass or ceramic cooking surface because it might cause scratches. It should be lifted vertically before repositioning.
Cast Iron Waffle Making Tips
As with many modern conveniences, purists prefer the extra-crispy, thin waffles only cast iron can make and have banished their electric equivalent to the basement. If you want to get back to waffle basics, follow these tips.
Start with a seasoned cast iron waffle pan. If your waffle iron has wooden handles, it cannot be seasoned in the oven and must be done on the stovetop.
Have heavy potholders or oven mitts at the ready because the handles will be extremely hot.
Before pouring the first waffle, heat the iron for 10 minutes over medium heat (in the case of a gas stovetop, flames should not lick up around the sides of the iron). Flip the iron a few times during this process so both sides are evenly heated.
If you have a non-contact infrared thermometer, point it at the waffle iron and if it registers 425 degrees F, the iron is ready.
If you open the lid of the iron and it smokes a lot (a few wisps when you first open it are OK), then the iron is too hot. Remove it from the heat for a few minutes, reduce the flame, and heat again.
Based on the size of your iron, pour enough waffle batter so that it comes about 3/4 inch shy of the edges to allow for expansion. You might need to experiment with your model for the optimal amount of batter to use.
Immediately close the lid, using oven mitts. Cook for about 1 minute. Using oven mitts, flip the iron and cook an additional 2 minutes. Open and remove the waffle with a fork. Based on the results of your first waffle, adjust the cooking time and heat. Let the waffle iron reheat before pouring the next waffle. Repeat with the remaining batter.
When finished cooking, remove the waffle iron from heat and open the lid. While it is still warm, but not hot, clean it by wiping the interior and exterior with a dry paper towel or cloth. Use a sturdy pastry brush to whisk away any crumbs caught in the iron grids. It shouldn't be necessary to use water but, if that's unavoidable, never soak the iron in water and dry immediately after washing.
To protect the iron from rust-causing moisture, lightly rub a small amount of vegetable oil into its crevices and surface but not so much that it becomes sticky.
Store the cleaned, cool and seasoned cast iron waffle iron in a cool, dry place away from moisture or rust-causing situations.